Thought my GPad had completely died, but it lives!
I tried everything i could on all the forums i could find when my LG GPad 8.3 V500 wouldn’t turn on
e.g. Press and hold the power button, Press and hold power and volume down together plugging into a computer and running some LG software etc..
Despite my best efforts none of these thing bought my dead LG GPad V500 back to life. Even when plugging the power cable in, nothing, not even a “charging” icon displayed.
I then found out that if you hold the power button for 20 seconds it’s the same as a battery pull (removing the battery) So i did that and then plugged the charger into the Gpad again. Nothing… but then… after a few minutes of being plugged in something appeared on the display… …the charging icon!
After leaving to charge for 15 mins i was able to power it on again! (thought i’d leave it to charge for a bit to be on the safe side)
No factory resets, no taking the LG V500 apart to get the battery out, so simple!
Hope this helps you and saves you buying another tablet.
If this helps you out please feel free to say thanks by clicking “Buy Me a Coffee” PayPal button in the sidebar (here) or via:https://www.paypal.me/AlanHart
Had an issue the last few weeks where DNS across the network would randomly just drop/timeout for a period of a few minutes to an hour or so. Across the entire network (at around lunctime) users would suddenly be unable to access certain websites but strangely applications like skype / outlook etc would still function normally.
I quickly diagnosed that it was a DNS issue as normal web browsing would fail but if i entered the domain’s IP address (using my phone and www.ip-lookup.net to find the domain ip) it would load instantly. I tried bypassing the local DNS server by changing DNS manually to Google DNS (8.8.8.8 and 8.8.4.4) but this also didn’t work while the “blackout” was in progress.
Summary of symptoms…
Connection not lost – existing connections stay alive (until bounced/rebooted)
Pings to 8.8.8.8 (Google DNS) all successful
Unable to resolve DNS through any DNS servers (Local DNS Server, Google DNS, Open DNS, ISP DNS etc) on any machine, laptop, server within the network.
nslookup fails with Local DNS server, Google DNS, Open DNS and ISP DNS
On router reboot DNS goes back to working OK for a period of time.
Restarting the router (a Draytek Vigor 2820 in this case) would fix the issue but usually DNS resolution would just drop off again sometime after (sometimes a few minutes, sometimes an hour or so).
After much frustration, and the realisation that it had to be something to do with the router, I rooted around in the Draytek Vigor 2820 settings to see what could be causing the DNS to drop off.
The penny dropped when looking at the DOS defence firewall settings. (Firewall > DOS Defence) in particular UDP Flood Defence
This particular connection is at best 8mb to i set this threshold value to 800. (See screengrab below)
I’m guessing everyone on their lunch breaks was hitting the connection hard with youtube, facebook, twitter, random browsing etc triggering the DoS defence filter.
This has now completely solved this incredibly annoying DNS issue.
If this helps you out please feel free to say thanks by clicking “Buy Me a Coffee” PayPal button in the sidebar (here) or via:https://www.paypal.me/AlanHart
Been struggling for a while with an HP CP2025 colour laser printer.
Essentially the CP2025 would print single pages perfectly fine. However, but when trying to print multiple page documents or multiple copies of the same file, the CP2015 would give a “Misprint” Error and then require the user to tap the OK button to continue.
It appears that some HP CP2025 models have some sort of defect in the paper pickup roller for paper tray 2. This defect causes a slight delay/hesitation when loading the paper which causes it to go slightly out of alignment, the printer responds to this mis-alignment by automatically going through a cleaning cycle. As this misfeed happens on the first printed side it spits the paper out without printing side 2 and requires the user to press OK to continue.
SOLUTIONS: If all trays have the problem…
These settings need to be changed only in printers using the webpage (type the printer’s IP address into your browser) ToolboxFX or EWS utility. (Note: Leave the OS printer driver / printer properties with default settings.)
Screenshot of the webpage
In System Tab and Paper Handling: Default Paper Size: A4 or Letter Default Paper Type: Plain Manual Feed: Off Tray 1 Size: Any Size Tray 1 Type: Any Type Tray 2 Size: A4 or Letter Tray 2 Type: Heavy 111-130g Tray 3 Size: A4 or Letter Tray 3 Type: Heavy 111-130g
Remember to click the [Apply] button!
Note: Tray 2 and Tray 3 availability will differ based on Models.
When I just changed “Tray 2 Size” and “Tray 2 Type” my CP2025 started printing properly again
If this helps you out please feel free to say thanks by clicking “Buy Me a Coffee” PayPal button in the sidebar (here) or via:https://www.paypal.me/AlanHart
Thank You
A few other thing to try if the above doesn’t work…
If the above solution doesn’t work for you then here are some other things you can try that i found in various places on the net:
If you share lots of stuff via YouTube or Google Plus you may have noticed that your posts page on your google plus profile shows everything you share, everytime you share it. This is fine if you only share something once but, if you share the same thing multiple times (on multiple sites/pages for example), then it will appear multiple times in your Google+ posts page, making it look a bit spammy.
Here’s how you can quickly and easily prevent this from happening….
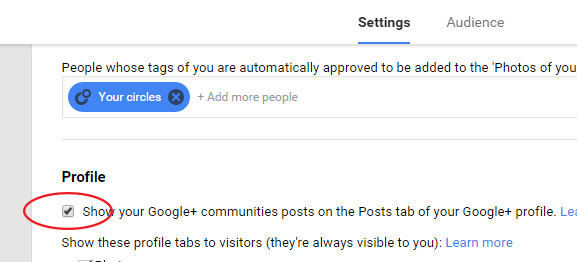
Go to your Google plus page
Click “Home” in the top left
Click “Settings”
Scroll to the “Profile” section near the (bottom)
Untick “Show your Google+ communities posts on the Posts tab of your Google+ profile”
Simple huh?
Hope this helped you. If it did please share on twitter, google plus, facebook etc or give me a little something towards my next caffeine fix by clicking the [Buy me a coffee] PayPal button in the sidebar!)
The other day I came across a problem while when installing McAfee Total Protection “as-a-service” (mcafeeasap.com) on a laptop which had a free trial version of McAfee pre-installed.
Once installed, the Virus scan part of McAfee as a service would say it was downloading the latest definitions but would never complete.
The taskbar status icon was grey and would stay greyed out (it’s supposed to be red if all is ok).
After much digging and google searching I came across quite a few methods to try and fix this but none seemed to work.
Here are the steps I took to fix this issue…
McAfee Total Protection Clean Install Procedure…
Follow all of the steps below to fix the issue.
NOTE: Ignore if ANY of the trouble shooting steps below end in failure and continue to proceed with them all in order…
2. Click on the “Utilities” tab-> select the sub tab “Migration & Optimization“.
3. Under the Cleanup Utility –> select the Download option.
4. Download and save it to the desktop then run the downloaded .exe file to uninstall.
5. Delete all entries from Start->Run->temp (usually “C:\windows\temp” depending on how your OS was installed) – Select all the files and folders and delete them (Ignore any files that you can’t delete)
6. Delete all entries from start->Run->%temp% (This is the user’s temp folder e.g. “C:\Users\Username\AppData\Local\Temp”) – Select all the files and folder under that and delete. (Ignore any files that you can’t delete)
7. Reboot the computer.
BEFORE YOU CONTINUE… Reset the Windows firewall to default and then disable the windows firewall before you start the installation.
Installation :
To install the updates for the Total Protection Service, use the Silent installation method.
3. Under the “Installation” tab, select the second option “Silent installation” to download.
4. save the vssetup.exe file to your c: drive.
5. Now click Start –> type cmd.exe into the search field.
6. Then right-click on cmd.exe and click “Run as administrator” to open the command prompt in admin mode.
7. Type cd\ (and hit the enter key)
6.Type or copy this command and paste
VSSETUP.EXE /CK=012345678901234567890123 /P=VFB
You must put YOUR company key in the above command (replace the numbers after CK=) and then run the command (hit enter).
The letter after the “P” parameter, V is the virus scan, F is the firewall and B the browser protection. If you want to install all these features leave the command as it is. if you don’t want a particualr feature installed you need to remove the letter (V, F or B) from the above command.
Run a complete update from the M shield icon (right click) after the install is done with the above method.
I hope this helps you out. If it works for you tweet me to say thanks or
Had a very annoying problem with Automatic Update & Security Centre on Windows XP earlier today.
Had the red icon warning that automatic updates were turned off. Clicked the icon which opens Windows Security Centre tried to enable Automatic Updates but wouldn’t work instead it gave me a lovely message stating
“Security Centre Could Not Change Automatic Update Settings”
… very helpful!
I found out that somehow Windows XP had gone a little screwy on the Windows Update side of things and more importantly i found out how to get Windows Update & Security Centre talking nicely to each other.
Here’s how I fixed this problem:
Click Start, select Run (or hold WinKey + R) and type:
regsvr32 wuapi.dll
Press enter after this and wait for the success message
Hope this helps you. If it does give me a tweet and let me know :) If not, i guess it’s back to Google for you!
Note: There may be another reason for this…
If, when visiting the Windows Update website and searching for available updates, you see the 0x8007043B error
This error may occur if WUAUSERV and BITS services are not configured correctly in the windows registry. See Microsoft article here: http://v5.windowsupdate.microsoft.com/v5consumer/showarticle.aspx?articleid=19&ln=en
You may have noticed that your Virgin Media SuperHub will sometimes drop out, maybe every 5-10 minutes! Or maybe your wireless is not working at all.
The problem could be that the software (called firmware) embedded in the Super Hub has problems when set above 802.11 B/G.
This is obviously rather annoying if you want to utilise more than 54mbps of your broadband connection over wi-fi. This issue is not a virgin media service problem.
If you don’t mind being limited to lower speeds, You can set your Super Hub to work at 54Mbps in the 2.4GHz band. Doing this should resolve any of these annoying intermittent / dropping connection issues.
You can do this by visiting http://192.168.100.1 (or whatever the IP of your superhub is) and click “Advanced”.
Then click the Wireless Settings section and change 802.11 mode to “Up to 54Mbps” and 802.11N Band to “2.4GHz”.
The Security Mode will not make any difference to the overall performance.