If you share lots of stuff via YouTube or Google Plus you may have noticed that your posts page on your google plus profile shows everything you share, everytime you share it.
This is fine if you only share something once but, if you share the same thing multiple times (on multiple sites/pages for example), then it will appear multiple times in your Google+ posts page, making it look a bit spammy.
Here’s how you can quickly and easily prevent this from happening….
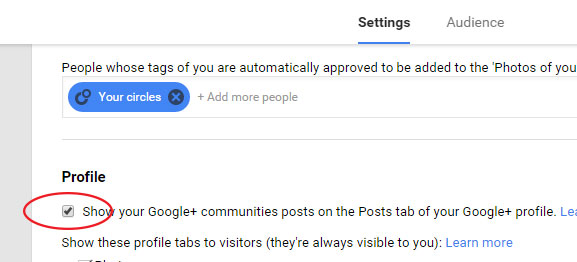
Go to your Google plus page
Click “Home” in the top left
Click “Settings”
Scroll to the “Profile” section near the (bottom)
Untick “Show your Google+ communities posts on the Posts tab of your Google+ profile”
Simple huh?
Hope this helped you. If it did please share on twitter, google plus, facebook etc or give me a little something towards my next caffeine fix by clicking the [Buy me a coffee] PayPal button in the sidebar!)
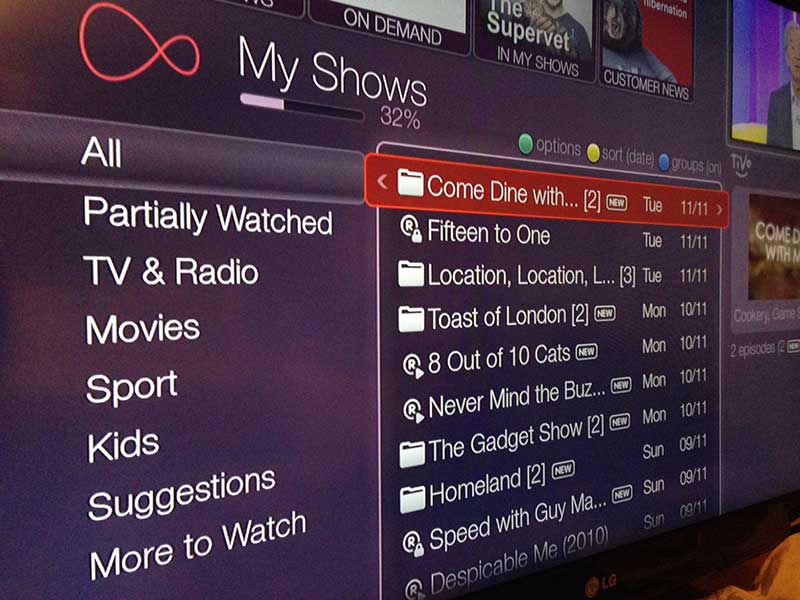
You may have noticed your Tivo box software has upgraded and the onscreen menu style has changed (it’s now a more subtle purple instead of bright red).
Along with this change is a feature adding a column to the left of your recorded items list.
The new “categories” view
If you don’t want this you can hide the left column making it look like it used to.
With categories hidden
Here’s how..
Press the Green button
Move down to the menu option “Left column [Show Categories]” and press the OK button
Lets say one of these domains is “mydomain.com” for example…
There are regular gmail users under the same “Google Apps” account
For a long time I have used the “Google Groups” feature to have a group email address.
What’s Google Apps Group?
If you don’t know (and let’s face it you probably do if you’re hear reading this) this is a feature which allows people to receive an email sent to a “Group” email address in their own inboxes.
e.g. Any email sent to the Google Apps Group email “appsgroup@mydomain.com” would go to the inboxes of three google accounts: alan@mydomain.com, ben@mydomain.com and carl@mydomain.com
In this scenario a “Google Group” is essentially just an alias address.
Recently (within the last few months) I have noticed that a few emails that have been sent to the appsgroup@mydomain.com group email address successfully arrive in the group members’ inboxes but with a From: header that looks like this:
From: ‘Someones name’ via AppsGroup [mailto:AppsGroup@YourDomain.com] Reply-to: Real Sender <RealSender@AnotherDomain.com>
In other words, Google Apps/Gmail is making the email look like it’s coming from the appsgroup@mydomain email (i.e. myself!)
In certain versions of outlook you cant actually visually see the senders real email address and on iPhone this may cause the actual name of the sender to show up with your own name, since iPhone Mail pulls the name from it’s address book rather than from the email headers.
Originally I thought that the senders real email address was lost forever but it is actually in the headers.
You should be able to just hit reply and it will reply to the persons email
The problem arose for me because someone forwarded the email to me, thus stripping the original headers and therefore unable to see the original sender’s email address.
Why does this happen?
It turns out that Yahoo and AOL made changes to require mail providers that support the DMARC standard to reject all email from @yahoo.com accounts unless the mail actually originated at AOL and Yahoo’s servers. (Other providers have followed suit.)
If you have a Google Group / Alias address forwarding to a gmail account, it will rewrite the From: header as explained above if the provider sending the email has a strict DMARC policy like AOL and Yahoo. If they didn’t, the email may be rejected, depending on where it’s being delivered. (See the DMARC FAQ, where it looks like Google chose option number 3).
It seems that the only way to fix this (i.e. prevent Google rewriting the header), is to remove your Google Group alias address, and replace it with an actual Google Apps user account you create with the same email address that you had for your Google Group alias. Then login to that new user account and set it up to forward mail to your email address.
Of course this does mean if you pay for Google Apps users that you will need to pay for another user!
I had to explain this all the the friend in question and get them to reveal the original sender’s email address.
To see the email headers in Outlook:
Right-click on the email in question, and choose “Message options”
Scroll through the “Internet heaers” text box at the bottom and you will see the original sent from address:
Reply-To: Persons Name <person@email.com> or
X-Original-Sender: person@email.com
or
X-Original-From: Persons Name <person@email.com>
The other day I came across a problem while when installing McAfee Total Protection “as-a-service” (mcafeeasap.com) on a laptop which had a free trial version of McAfee pre-installed.
Once installed, the Virus scan part of McAfee as a service would say it was downloading the latest definitions but would never complete.
The taskbar status icon was grey and would stay greyed out (it’s supposed to be red if all is ok).
After much digging and google searching I came across quite a few methods to try and fix this but none seemed to work.
Here are the steps I took to fix this issue…
McAfee Total Protection Clean Install Procedure…
Follow all of the steps below to fix the issue.
NOTE: Ignore if ANY of the trouble shooting steps below end in failure and continue to proceed with them all in order…
2. Click on the “Utilities” tab-> select the sub tab “Migration & Optimization“.
3. Under the Cleanup Utility –> select the Download option.
4. Download and save it to the desktop then run the downloaded .exe file to uninstall.
5. Delete all entries from Start->Run->temp (usually “C:\windows\temp” depending on how your OS was installed) – Select all the files and folders and delete them (Ignore any files that you can’t delete)
6. Delete all entries from start->Run->%temp% (This is the user’s temp folder e.g. “C:\Users\Username\AppData\Local\Temp”) – Select all the files and folder under that and delete. (Ignore any files that you can’t delete)
7. Reboot the computer.
BEFORE YOU CONTINUE… Reset the Windows firewall to default and then disable the windows firewall before you start the installation.
Installation :
To install the updates for the Total Protection Service, use the Silent installation method.
3. Under the “Installation” tab, select the second option “Silent installation” to download.
4. save the vssetup.exe file to your c: drive.
5. Now click Start –> type cmd.exe into the search field.
6. Then right-click on cmd.exe and click “Run as administrator” to open the command prompt in admin mode.
7. Type cd\ (and hit the enter key)
6.Type or copy this command and paste
VSSETUP.EXE /CK=012345678901234567890123 /P=VFB
You must put YOUR company key in the above command (replace the numbers after CK=) and then run the command (hit enter).
The letter after the “P” parameter, V is the virus scan, F is the firewall and B the browser protection. If you want to install all these features leave the command as it is. if you don’t want a particualr feature installed you need to remove the letter (V, F or B) from the above command.
Run a complete update from the M shield icon (right click) after the install is done with the above method.
I hope this helps you out. If it works for you tweet me to say thanks or
I needed to create a basic script to execute a user selected routine but needed a simple way to capture the users choice. Like a MsgBox but with multiple options.
Here’s some nice simple code for a VBScript Option Box in case you want to do the same.
First we create a very basic HTML file which will act as the dialog box. (the options and buttons)…
<HTML>
<HEAD>
<TITLE>Make a selection</TITLE>
<SCRIPT language="VBScript">
Sub OKClick
If MenuOption(0).Checked Then
ChosenOption.Value = "Option 1"
End If
If MenuOption(1).Checked Then
ChosenOption.Value = "Option 2"
End If
If MenuOption(2).Checked Then
ChosenOption.Value = "Option 3"
End If
End Sub
Sub CancelClick
ChosenOption.Value = "Cancelled"
End Sub
The hidden input above is used to store the users chosen option.
The VBScript below, opens the HTML file and loops while waiting for this chosen option value to change.
When this chosen option value changes the VBScript captures this chosen option in a variable so it knows what the user selected.
Set objExplorer = CreateObject("InternetExplorer.Application")
Select Case strSelection
Case "Option 1"
Wscript.Echo "You selected Option 1."
Case "Option 2"
Wscript.Echo "You selected Option 2."
Case "Option 3"
Wscript.Echo "You selected Option 3."
Case "Cancelled"
Wscript.Quit
End Select
Of course, instead of echoing the selected option you would put the code you want to run under each case.
This is a nice flexible solution allowing you to easily add/remove options.
You can do away with the OK button and, in the HTML, add onClick="OKClick()" to the radio button elements, so the user only needs to click once on the option they want.
Because I’m so nice you can download the VBS and HTML files in this handy VBS Option Box Script Zip(851 bytes)
Note: make sure to put the HTML file in "C:\Script\" to test. (Or change the line in the .VBS file pointing to the location of the HTML file.
I’m still using Dreamweaver CS3 for some web stuff. It does all I need it to do, or at least it did until it suddenly just decided to not load anymore!
I tried rebooting, tried running as admin, tried running in compatibility mode etc.
Finally I found that there now appears to be a some kind of issue with Windows Aero, on my laptop at least.
So, after much frustration I finally got it to work.
If your Dreamweaver CS3 has stopped loading in Windows 7 you can get it to work by just changing these settings …
1. Right click the Dreamweaver shortcut and then click “Properties”.
2. Click the “Compatability” tab.
3. Under the “Settings” section:
Tick “Disable visual themes” and “Disable desktop composition”
(It does seem to work without ticking “Disable visual themes”, but a couple of times it didn’t start so I left mine ticked just in case.)
You’ll notice that you lose your nice aero transparency / colours etc but at least you can now use Dreamweaver CS3 on Windows 7 again!
You could disable Windows Aero completely, or just the Aero Peek feature, but seems overkill to change the entire OS appearance just for the sake of one misbehaving application.
If this helped you please tweet me (@alanhart) or comment below to let me know!
One of my lovely twitter followers has released her lovely anti-bullying single, ‘I’m an individual’ a percentage of the proceeds go to beatbullying uk
Please check it out and download if you like it (or even if you dont – it’s for a good cause!)
I have made simple Redirect Check Tool.This tool can quickly and easily tell you if an URL redirects to another, the URL where it redirects to and the response headers returned by the server.
This is useful for SEO purposes and also if you have asked your web hosting company to make 301 redirect changes on your behlaf and you wish to check everything redirects OK
Enter an URL in the form below and you’ll be taken to the results page where you will see the URL header response code (type of redirect) and where the URL redirects to.


")